I spent a whole day wrestling with it, but GraphRAG is finally deployed. Here’s a record of the bittersweet pitfall-hunting process.
1. Introduction to GraphRAG
As per tradition, a little intro to GraphRAG (honestly, it’s just padding for word count — GPT wrote most of it)
1. Introduction
Microsoft has open-sourced a new retrieval-augmented generation (RAG) system built on knowledge graphs: GraphRAG. The framework mainly addresses how to apply retrieval-augmented generation (RAG) to global questions over an entire text corpus, e.g. “What are the main topics in the dataset?”
2. Innovations
- Graph RAG method: proposes a new Graph RAG method that combines knowledge graph construction, retrieval-augmented generation (RAG), and query-focused summarization (QFS) to support human sense-making over an entire text corpus. The method specifically targets global-scale questions like “What are the main topics in the dataset?”
- Two-stage graph index construction: the Graph RAG method uses a large language model (LLM) to build a graph-based text index in two stages:
- Stage one: extract entities from the source documents and build an entity knowledge graph.
- Stage two: pre-generate community summaries for all groups of closely related entities.
- Community detection algorithm: uses a community detection algorithm (such as the Leiden algorithm) to divide the graph index into modular communities, where nodes (entities) within a community are more strongly connected.
- Query-focused summarization: community summaries are merged into the final global answer via query-focused summarization, which works particularly well for handling large-scale text datasets.
3. Algorithm
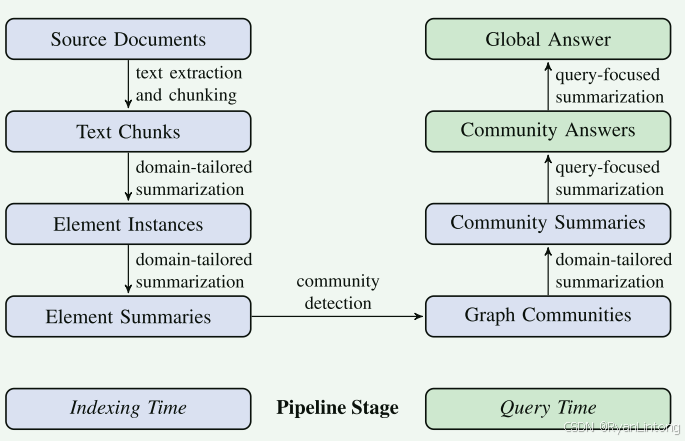
- Graph index construction: first, an LLM processes the source documents, extracting entities and relations to build an entity knowledge graph. Then a community detection algorithm partitions the graph into communities, and a summary is generated for each community.
- Query processing: when a user query arrives, the system uses the community summaries to produce partial answers. These partial answers are then aggregated and summarized into the final answer for the user.
- Parallel processing: during both indexing and querying, the system can process community summaries in parallel, which improves processing efficiency and allows it to handle large-scale datasets.
- Modularity and scalability: the modular design of the Graph RAG method lets it adapt to datasets of different sizes and types while remaining efficient and scalable.
4. Data and Experimental Results
- Dataset selection: two datasets of roughly one million tokens each were chosen for evaluation, including podcast transcripts and news articles — types of text corpora users are likely to encounter in real-world activities.
- Question generation: an activity-centered approach was used to automatically generate questions that require understanding the entire corpus rather than details of a specific text.
- Condition comparison: six different conditions were compared, including Graph RAG at different levels of graph communities (C0, C1, C2, C3), text summarization (TS) applying a map-reduce method directly to the source text, and a naive “semantic search” RAG method (SS).
- Evaluation metrics: an LLM evaluator was used for head-to-head comparison, choosing three target metrics that capture qualities beneficial to sense-making activities: comprehensiveness, diversity, and empowerment. Directness was used as the validity metric.
- Result analysis:
- Global methods vs. naive RAG: global methods consistently outperform the naive RAG method on comprehensiveness and diversity.
- Community summaries vs. source text: community summaries generally provide a small but consistent improvement in answer comprehensiveness and diversity, especially mid-level community summaries on the podcast dataset and low-level community summaries on the news dataset.
- Empowerment: empowerment comparisons showed mixed results, but LLM analysis identified the ability to provide concrete examples, references, and citations as key to helping users reach an informed understanding.
- Context window size: different context window sizes were tested, and the smallest one (8k) generally performed better on comprehensiveness while being comparable to larger context windows on diversity and empowerment.
5. Limitations and Outlook
- Current evaluation is limited to one class of global-sense-making questions and datasets of roughly one million tokens; future work needs to validate performance across different question types, data types, and dataset sizes.
- Consider the trade-offs of building the graph index, including the compute budget, the expected number of queries, and other value derived from the graph index.
- Future work may include more localized RAG methods, as well as hybrid RAG schemes that combine embedding-based matching with community reports.
2. Local Deployment
There are already plenty of tutorials out there, but while actually running the model I still hit a lot of bugs, so I’m recording them here. I mainly followed a few tutorials during deployment — they’re listed at the end.
1. Why deploy locally
The code of Microsoft’s open-source GraphRAG project is tightly coupled with OpenAI’s ChatGPT, which is really unfriendly to someone as broke as me who also can’t conveniently access the Chinese internet… I mean, the global internet — word of mouth says running one official demo costs $10. Open-source models are just more convenient. Long live open source!!
If you’re rich, just use the official hosted project; if you want to plug in a local or domestic model, the community deployment tutorials are also worth a look.
2. Environment preparation
I won’t waste words on the basic environment setup. My environment:
- OS: Windows 11
- PyCharm 2024.2.0.1
- Python 3.12
- Ollama (there are tons of tutorials on installing and using Ollama; this one is a good reference: handy-ollama)
3. Installing GraphRAG
3.1 Download GraphRAG
Command line:
git clone https://github.com/microsoft/graphrag.git
One note here: many tutorials use this repo URL: https://github.com/TheAiSingularity/graphrag-local-ollama.git, while this post uses the official one. As said above, Microsoft’s GraphRAG code is tightly coupled with OpenAI’s ChatGPT, and switching to Ollama requires a lot of modifications. That is exactly the difference between TheAiSingularity’s fork and the official repo. But, but, judging by my deployment as of today (2024.8.28), their modifications are incomplete — plenty of places still need changing (I’ve already submitted a PR, hopefully they’ll merge it). For completeness, the rest of this post walks through modifying the official project directly (it’s actually not that much).
3.2 Install dependencies
Enter the GraphRAG installation directory:
cd graphrag
The noob-friendly way: install the dependencies:
pip install -e .
3.3 Create the data directory
Inside the GraphRAG installation directory, create the folder ragtest/input — this is just for easier management; you can also create an input folder directly. Put the data you want to index into the input folder (only txt files are supported; you can have multiple).
3.4 Initialize the project
python -m graphrag.index --init --root ./ragtest
This generates the output folder, settings.yaml, prompts, .env (hidden by default), etc. under ragtest. settings.yaml is the config file that needs to be modified next, and output holds the results and run logs of each model run.
3.5 Modify the config file
Since we’re switching to a local model, settings.yaml must be edited. Change these four places:
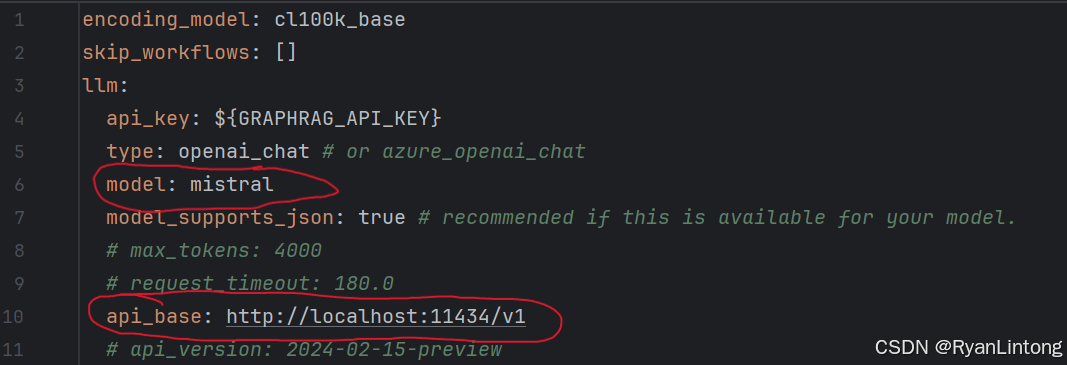
- My model is mistral — just adjust this to whatever model you use.
api_baseis Ollama’s default address, usually this one (just make sure your port isn’t occupied).
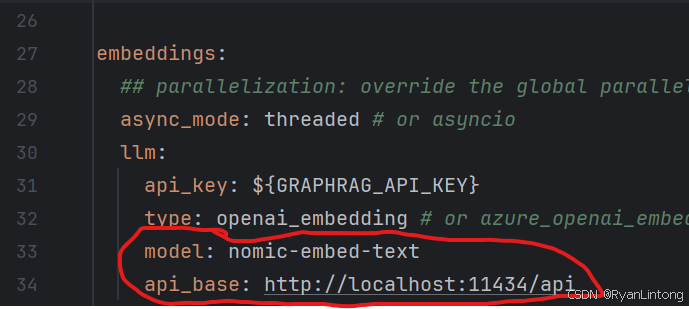
- Note: embeddings and the llm above are two different models;
nomic-embed-textis recommended. Also,api_basehere ends withapi.
3.6 Modify the .env file
Delete the original contents and replace them with:
GRAPHRAG_API_KEY=ollama
GRAPHRAG_CLAIM_EXTRACTION_ENABLED=True
The parameter GRAPHRAG_CLAIM_EXTRACTION_ENABLED=True must be added, otherwise covariates won’t be generated and Local Search will fail.
3.7 Modify the source code
A few code changes are needed here. Don’t worry, it’s simple — more than half of it is already done.
In your GraphRAG installation directory there should be a folder named graphrag that looks like this:
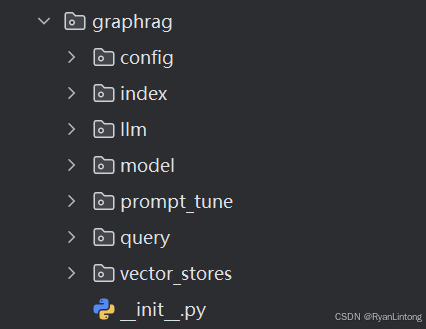
We need to modify three files in it:
- llm\openai\openai_embeddings_llm.py
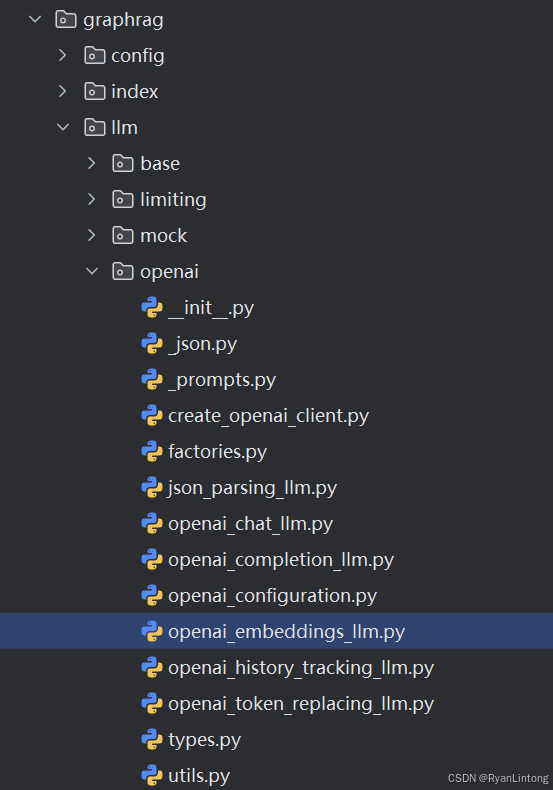
Just import the Ollama dependency and change the last five lines of code (see the comments; the commented-out code is the original source):
#openai_embeddings_llm.py

from typing_extensions import Unpack
from graphrag.llm.base import BaseLLM
from graphrag.llm.types import (
    EmbeddingInput,
    EmbeddingOutput,
    LLMInput,
)
from .openai_configuration import OpenAIConfiguration
from .types import OpenAIClientTypes
import ollama # added dependency

class OpenAIEmbeddingsLLM(BaseLLM[EmbeddingInput, EmbeddingOutput]):
    _client: OpenAIClientTypes
    _configuration: OpenAIConfiguration

    def __init__(self, client: OpenAIClientTypes, configuration: OpenAIConfiguration):
        self._client = client
        self._configuration = configuration

    async def _execute_llm(
        self, input: EmbeddingInput, **kwargs: Unpack[LLMInput]
    ) -> EmbeddingOutput | None:
        args = {
            "model": self._configuration.model,
            **(kwargs.get("model_parameters") or {}),
        }
        # modified here
        '''
        embedding_list = []
        for inp in input:
            embedding = ollama.embeddings(model=self._configuration.model, prompt=inp)
            embedding_list.append(embedding["embedding"])
        return embedding_list
        '''
        embedding_list = []
        for inp in input:
            embedding = ollama.embeddings(model=self._configuration.model, prompt=inp)
            embedding_list.append(embedding["embedding"])
        return embedding_list
- query\llm\oai\embedding.py
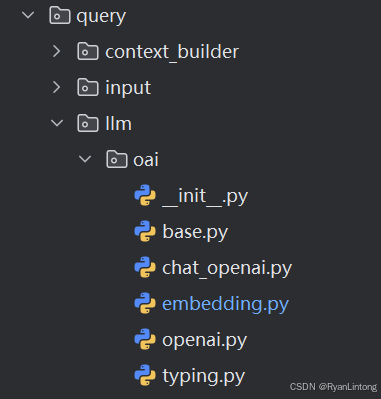
Call the model service provided by ollama (see the comments; the commented-out code is the original):
# added dependency
import ollama
def embed(self, text: str, **kwargs: Any) -> list[float]:
        """
        Embed text using OpenAI Embedding's sync function.

        For text longer than max_tokens, chunk texts into max_tokens, embed each chunk, then combine using weighted average.
        Please refer to: https://github.com/openai/openai-cookbook/blob/main/examples/Embedding_long_inputs.ipynb
        """
        token_chunks = chunk_text(
            text=text, token_encoder=self.token_encoder, max_tokens=self.max_tokens
        )
        chunk_embeddings = []
        chunk_lens = []
        for chunk in token_chunks:
            try:
                '''
                embedding, chunk_len = self._embed_with_retry(chunk, **kwargs)
                '''
                # modified embedding, chunk_len
                embedding = ollama.embeddings(model='nomic-embed-text', prompt=chunk)['embedding']
                chunk_len = len(chunk)
                chunk_embeddings.append(embedding)
                chunk_lens.append(chunk_len)
            # TODO: catch a more specific exception
            except Exception as e:  # noqa BLE001
                self._reporter.error(
                    message="Error embedding chunk",
                    details={self.__class__.__name__: str(e)},
                )

                continue
        '''
        chunk_embeddings = np.average(chunk_embeddings, axis=0, weights=chunk_lens)
        chunk_embeddings = chunk_embeddings / np.linalg.norm(chunk_embeddings)
        return chunk_embeddings.tolist()
        '''
        return chunk_embeddings
- query\llm\text_utils.py
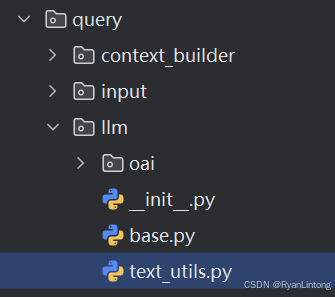
Just add one line to the chunk_text() function:
def chunk_text(
    text: str, max_tokens: int, token_encoder: tiktoken.Encoding | None = None
):
    """Chunk text by token length."""
    if token_encoder is None:
        token_encoder = tiktoken.get_encoding("cl100k_base")
    tokens = token_encoder.encode(text)  # type: ignore
    # add the line below: decode tokens back into a string
    tokens = token_encoder.decode(tokens)

    chunk_iterator = batched(iter(tokens), max_tokens)
    yield from chunk_iterator
Finally done!
4. Indexing
That is, the indexing process: use the LLM to extract nodes (e.g. entities), edges (e.g. relations), and covariates (e.g. claims), then use community detection to partition the whole knowledge graph, and use the LLM once more to summarize it.
Enter the GraphRAG installation directory and type in the command line:
python -m graphrag.index --root ./ragtest
This takes a while, depending on the size of the data in the input folder — I put in a 6k file and it ran for 5 minutes.
When it finishes it should look like this:
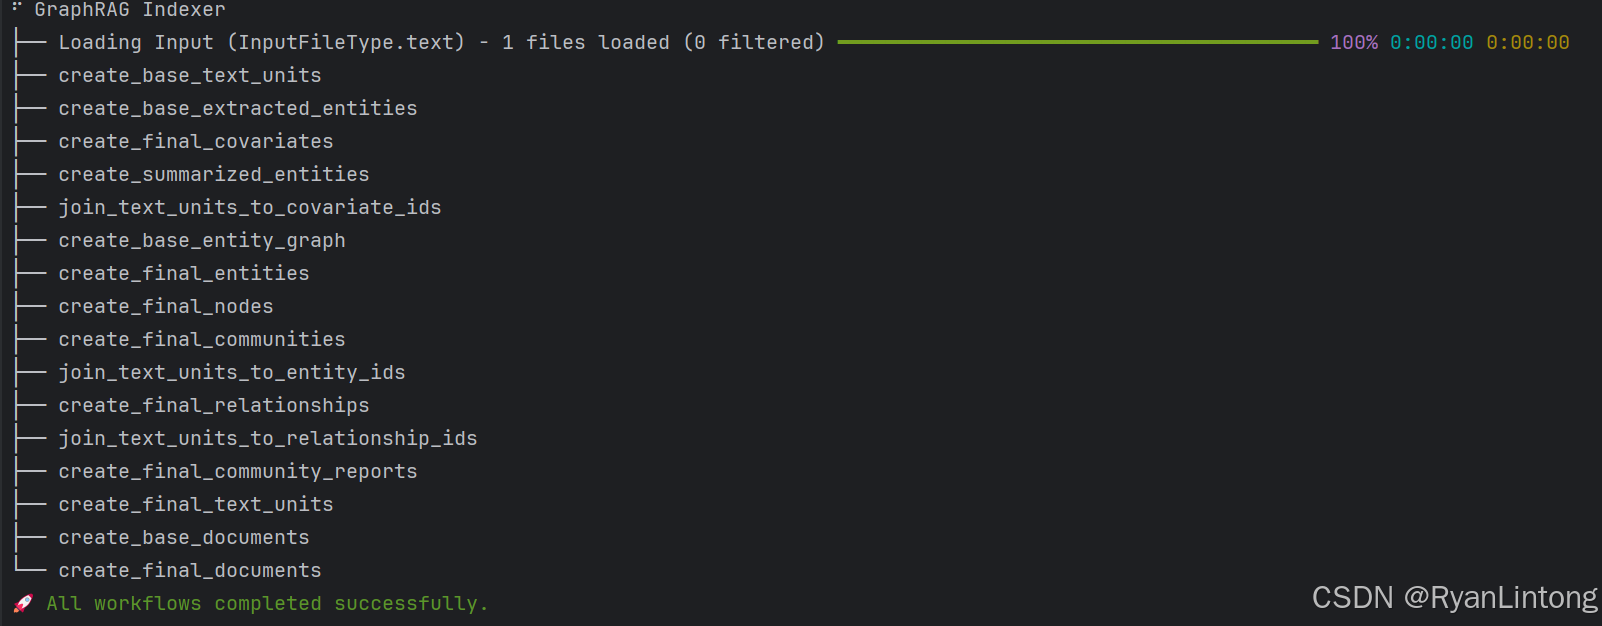
5. Query
Time for the Q&A part. This section still needs two more files modified (hehe, it’s easy).
5.1 Modify the code
Only two files, again both under the query folder mentioned in section 3.7: there’s one search.py file each in structured_search’s global_search and local_search.
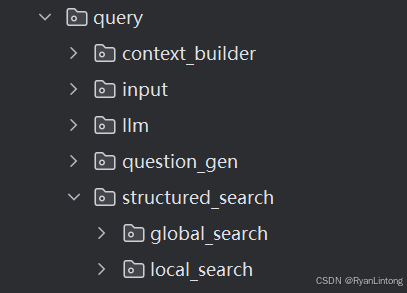
Change every search_messages variable in them (4 places in total) to the format below (the commented-out code is the original):
#search_messages = [
#  {"role": "system", "content": search_prompt},
#  {"role": "user", "content": query},
#]
search_messages = [ {"role": "user", "content": search_prompt + "\n\n### USER QUESTION ### \n\n" + query} ]
I really did change all of them, cross my heart.
5.2 Start querying
This is the usage stage. There are two ways to query: global_search and local_search — global search focuses on understanding the dataset as a whole, while local search has more detail.
- global_search
Enter the GraphRAG installation directory and type in the command line:
python -m graphrag.query --root ./ragtest --method global "what is cnn?"
The text in quotes is your question. The output:
Convolutional Neural Networks (CNNs) are a type of deep learning model that excel in image processing tasks. They automatically and adaptively learn spatial hierarchies of features from images, making them effective for tasks such as object recognition, image classification, and image segmentation [Data: Reports (1, 2, +more)].

CNNs consist of multiple layers, including convolutional layers, pooling layers, and fully connected layers. Convolutional layers apply a series of filters to the input image, creating feature maps that capture spatial patterns within the image [Data: Reports (1, 3)]. Pooling layers downsample the feature maps, reducing their size and increasing translation invariance [Data: Reports (2, +more)].

One key advantage of CNNs is their ability to learn hierarchical representations of features. This means that they can automatically learn complex patterns at multiple levels of abstraction, making them effective for tasks where the relevant features may be difficult to specify manually [Data: Reports (1, 4)].

However, CNNs can also be challenging to work with due to their complexity and the need for large, diverse, and accurately labeled datasets. Reproducing results from previous studies or experiments involving CNNs can also be difficult [Data: Reports (5)]. Despite these challenges, ongoing research in the field of CNNs continues to improve their performance and applicability. Techniques such as transfer learning, continual learning, and explainability are being explored to address some of these challenges [Data: Reports (1, 6)].
- local_search
Enter the GraphRAG installation directory and type in the command line:
python -m graphrag.query --root ./ragtest --method local "what is cnn?"
The text in quotes is your question. The output:
CNN, or Convolutional Neural Network, is a type of artificial neural network primarily used for image processing tasks such as object recognition, classification, and localization. It's one of the most popular deep learning architectures due to its effectiveness in handling 2D data like images.

### How CNN Works

CNN operates by using convolutional layers, pooling layers, and fully connected layers. The convolutional layer applies a series of filters (or kernels) to the input image, creating feature maps that help identify patterns within the image. The pooling layer then downsamples these feature maps, reducing their spatial size while retaining important features. Finally, the fully connected layer processes the flattened output from the pooling layer and makes a prediction based on the learned features.

### Advantages of CNN

1. **Efficient Use of Data**: CNNs are designed to take advantage of the spatial hierarchy in data, which means they can learn more efficiently compared to fully connected networks when dealing with large amounts of image data.
2. **Robustness**: CNNs have shown robust performance on various image classification tasks, even when trained on a limited amount of data.
3. **Transfer Learning**: Due to their ability to learn hierarchical features, CNNs can be fine-tuned for different tasks by using pre-trained models, making them versatile and efficient in various applications.

### Examples of CNN Applications

1. Image Classification: Identifying objects within images, such as recognizing animals, vehicles, or specific items.
2. Object Detection: Localizing objects within an image and predicting their bounding boxes.
3. Facial Recognition: Identifying individuals based on facial features in images or videos.
4. Medical Imaging Analysis: Assisting doctors in diagnosing diseases by analyzing medical images like X-rays, MRIs, or CT scans.
5. Self-driving Cars: Helping autonomous vehicles recognize traffic signs, pedestrians, and other vehicles on the road.
Done.
6. Pitfall Summary
6.1 Model selection
This was the biggest pitfall I fell into — two whole hours of struggling. At first my llm model was llama3.1, and the indexing process simply would not go through, throwing this error:
RuntimeError: Failed to generate valid JSON output
The cause: some models can’t generate valid JSON output, and setting the model_supports_json option in settings.yaml to false still didn’t fix it. Later I switched to the mistral model and everything went smoothly. So watch which model you pick.
6.2 Other errors during indexing
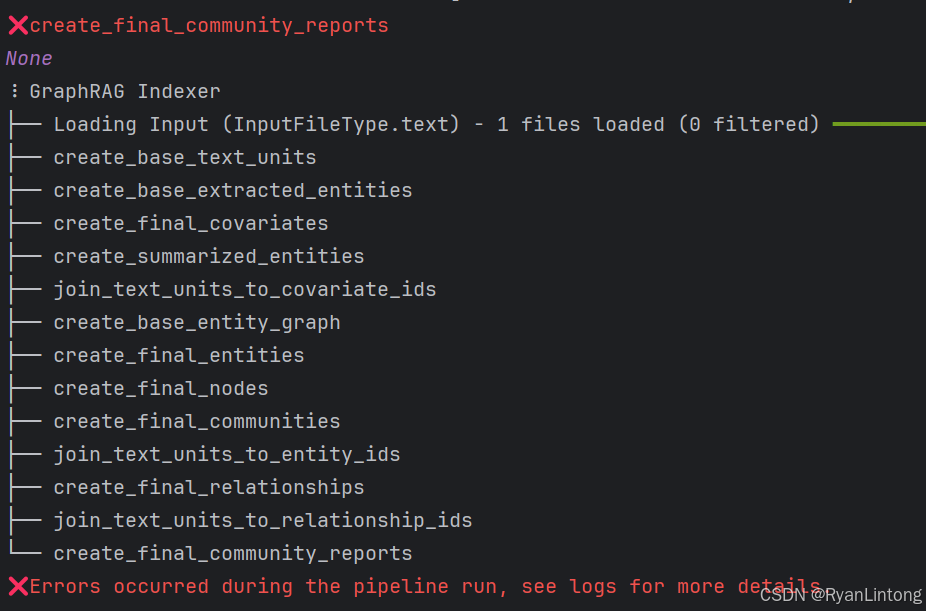
The cause is almost always a file you didn’t finish modifying — see section 3.7.
6.3 Errors during querying
ZeroDivisionError: Weights sum to zero, can't be normalized
Just modify the code per section 5.1.
References
- https://github.com/microsoft/graphrag/issues/575
- https://github.com/microsoft/graphrag/issues/646
- https://www.cnblogs.com/egalistmir/p/18347600
- https://www.cnblogs.com/fanzhidongyzby/p/18294348/ms-graphrag
-
Previous
学习最优化课程中的一些疑惑Questions from an Optimization Course: Cartesian Products and Convex Sets -
Next
傻瓜操作:GraphRAG、Ollama 本地部署及踩坑记录A Noob-Friendly Guide: Deploying GraphRAG with Local Ollama, and Every Pitfall I Hit
If this post helped you, a coffee is always welcome ☕